
How To Display Price Ranges On Shopify Collection Pages
Some businesses have made a common mistake that is ignoring collection pages. In fact, collection pages play an integral part in boost sale, because it gives your customers the first impression available products and their prices. As you all know that the first impression is really important, which affects customers’ decisions on whether to purchase a product. Therefore, any improvement that you take into your collection page can drive conversion for your clients.
In this case, the one-size-fits-all approach maybe not suitable due to many differences in prices and sizes. For example, your clients may have a range of different prices for each product variant and would like to represent this price range on the collection page.
So how to display prices as a range on Shopify collection pages, rather than one single value? Using Liquid objects and tags is an answer to this question. So in this article, we will give you the guideline to do that. In addition, we will also help you to know how variables can be created to simplify code, and how control flow tags can allow us to render content on specific pages.
Step 1: Locating our product prices
At first, you need to identify exactly where in your theme that you will locate the code for outputting product prices. Different themes have different locations of the price-related code. Some themes will have a specific snippet file dedicated to price, while other themes combine all product-related code in one Liquid file.
For this reason, searching the theme for Liquid objects associated with prices is an effective way to locate the code for outputting product prices. There is a recommendation for you when searching for variant.price or product.price objects in theme files, you should find them located in a snippet file. In case you edit your theme locally on a text editor like Atom, then it will be easier for you to search through the whole project.
In order to write cleaner and more readable code, theme developers often use assign tags to create variables. To make it easier for you to imagine, look at the example below:

From the example, you can see that the variant.price object is first given a variable of price. For the second assign tag, it creates a variable of money_price, which applies a money Liquid filter to the product price. This money filter is created with the purpose to make sure that the value is outputted with the correct currency formatting.
In this case, it just uses if operator, there are more four operators which are unless, else / elsif, case / when, Multiple conditions (and / or). If you want to learn more about the control flow tags, you can visit here.
If you have the results that variant.price or product.price is assigned a variable in a snippet file, it seems that you will find the code you need to customize in this file.
Step 2: Customizing our snippet file
After finding out the code for outputting the product price, you will see something like the following:
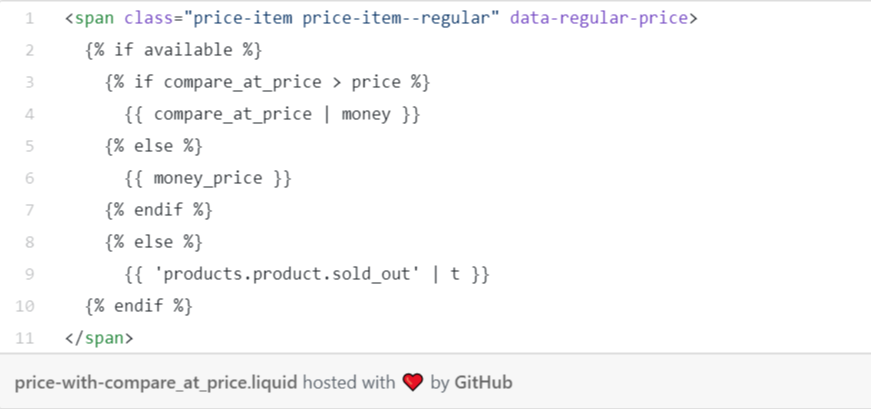
If you want to display the minimum and maximum product prices, you can use Liquid objects. Specifically, you will remove the following lines from the above code example:

Then, replacing them with:

In this example, it is using control flow tags to set up two conditions that when true, will execute the code below it. Besides, if you want to add more complex conditionals, the and operator allows you to include more than one condition in a control flow tag.
In the above example, it is checking whether there’s a variation in the product prices and whether the currently viewed page is a collection page. And if it is price variation, and the page is a collection page, then the output of the product.price_min and product.price_max is the lowest and highest variant prices.
So why we have to check is it a collection page or not? Because we want other pages of the online store, like the product page, display the price for the currently selected variant. With the product page, we want to let the price adjust dynamically when another variant is selected.
After adding these conditions, the price-related part of your file should look like:
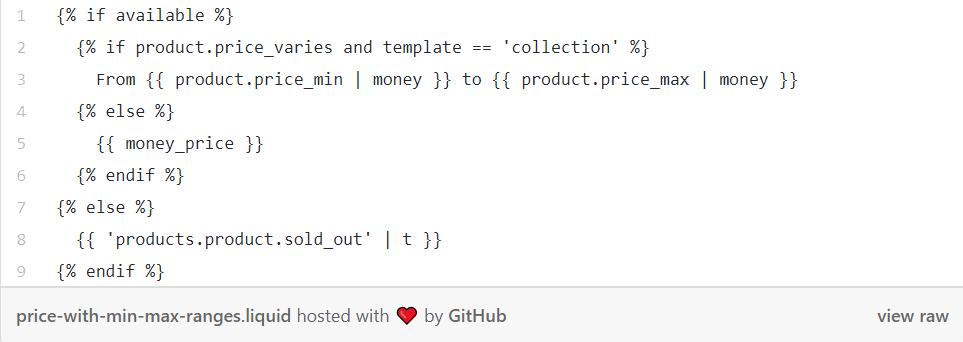
Also, you can see that in case there’s no variation in pricing, or if the page a buyer is viewing is not a collection page, the output will be the money_price variable.
Step 3: Styling our changes
The final step you have to take is to adjust the class names and CSS related to your prices. Due to the removing the code connected with the compare at prices, then the class names associated with compare at prices also need removing as well.
For illustrate, take a look at the example of Liam Griffin, a Partner Education and Front End Developer Advocate at Shopify. He is now working on Debut, and he needs to simplify the opening description list class from <dl class=”price{% if available and compare_at_price > price %} price–on-sale{% endif %}”> to just <dl class=”price”>.
Besides, you may also need to edit the stylesheet of your theme. By doing that, you can add text decoration or font-weight that matches how prices appear in other areas of the store. To make sure that the prices appear in a consistent and appropriate format, you need to test and adjust the styling.
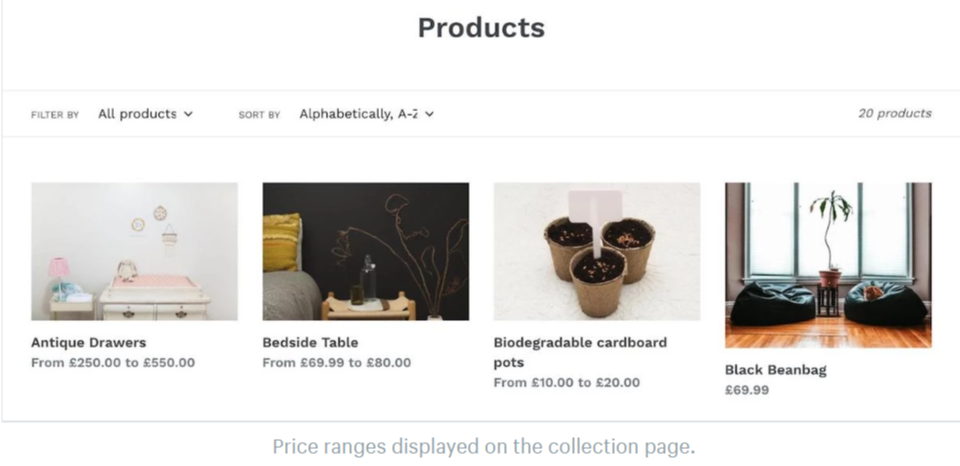
Once set up good these above things, you will see the available price ranges for your products, and your collection pages will look like:
Final Thoughts
Liquid objects, tags, and filters provide you with a wide range of flexibility that can be built into your custom themes. In addition, you can leverage Liquid to meet customers’ specific requirements.
Examining the types of products your clients have, and seeing how different Liquid objects and design techniques could improve their visibility is the two way that you can add value to your projects. If you need any further information about the price display, you can post your questions on the Shopify Community.


You May Also Like

Main Steps To Use Facebook Advertising

What To Do With Shopify After Installation?